Saturday, August 26, 2023

 ðŸ˜žðŸ˜žðŸ˜ž WHAT HAPPENED?

Unbelievable! I cannot fathom out WHY I stopped writing on my blog after May 2017!!! I also cannot remember what happened in that year. I know I WAS still crafting, as I have photos to prove my work, but WHY WHY did I stop posting here? It is now 2023, and YES, the world experienced a terrible upset from 2020 to 2022, and YES I retired in 2018, - did I just "forget" about the blog? Dunno, really dunno.

Anyway, it is time to catch up, and let you know what crafts I have done in the last 6 years! I can remember that I was giving craft classes at the local craft shop, so some of the next posts will highlight the classes I gave in each year.

Bear with me, as I catch up in my own mind!


Saturday, October 20, 2018

 Foil Tape Class

I also 'played' with Aluminium FOIL TAPE - you know - the type of tape you buy on a roll at the local hardware store, and which hubby uses to seal pipes etc! Who would have thought that this tape creates the most amazing craft. It is adhesive, so no having to use glues, and is also flexible so can be dented in and raised without it tearing. My first class was an easy class - make a wall plaque using foil and scrapbook paper. 

We started with a blank piece of greyboard, then using stencils and Statex (the paste with the fine grit in it), we created a scene on the board. Some pupils also added thin chipboard letters. Once dry, Aluminium tape was torn from the roll, the backing peeled of bit-by-bit, and pressed down over the board and scene. Using a paper stub, we pressed all around the images, and even created small dents in the background. The final process is to paint the whole covered board with black acrylic paint, let it dry a little, and then gently rub off with a dry cloth. Where the indentations are, the black paint will remain, Easy peasy. Hint: you can easily use diecut images under the foil tape.


Saturday, April 21, 2018

 Mini Concertina Album

Have you ever made one of these small, but cute, Concertina Albums? It makes a really super gift, because you can put 20 small photos into it - it is double-sided, and flips over very easily. This one was made for a Stork Party to celebrate the arrival of a new baby.


I used 1 x A4 greyboard, 2 x double-sided scrapbook pages, 2 x single-sided patterned papers, 1 x plain cardstock to match, and glue, tape, velcro dots, and embellishments.


Wednesday, December 13, 2017

 It's that time of Year to start making Christmas gifts!

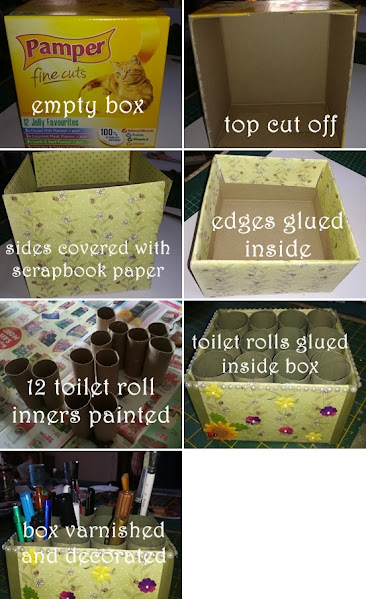
I have 2 cats, who seem to eat their way through a large amount of wet cat food packets. Linked to this then, is also my collection of the boxes these sachets are sold in. Why did I keep these boxes? Because they are STURDY, well-made, and a thick cardboard. I mean, as a crafter would you not also keep these boxes? I had more than enough boxes to organise a craft class in how to make a Desktop Pen/Pencil Holder. This is my sample ... (side edit note, I am still using this same box 6 years later!)


Instead of doing a lengthy text description, here is a collage of how to make it. The fun part of this craft is that the pencil/pen holders can be customised for the person receiving it, based on the scrapbook paper used. We have since make countless gifts just like this one.


Friday, September 29, 2017

 My Calligraphy Project

This year I started learning calligraphy. My first lesson was difficult to say the least - I seriously thought that we were just going to spend the next 2 years doing mathematics!! Yes, calligraphy does require angles and distance to perfect the craft, but I soon learnt that my initial fear was uncalled for. After each lesson we were given a 'project' to complete, using the lessons learnt to date. This project was to write on vellum so that a light could shine through, and the writing would be visible. I made this little luminar with a removeable lid. I think it came out OK, although I probably spent more time making the luminar than doing the actual calligraphy!


Saturday, September 23, 2017

 Colouring in a Digistamp

This was my first class teaching students how to colour in, using aqua pencils and Odourless Mineral Spirits (OMS). After completing the colouring in, we made up a card with the image. The digistamp was one of Digistamps4Joy's images, drawn by me.

The use of OMS makes the pencil lines blend into one another, creating a smoother look. The OMS dries up fairly quickly, with no evidence of having been used on the paper. We added a few gems and white pen lines to create highlilghts.


Saturday, June 10, 2017

 Making a Cutler Holder and decorating it with Pewter

A few people attended the class on "How to decorate a wooden item with pewter, and also how to make your own glass tiles". This is the sampe that I made for the class.

Each participant was given a wooden cutlery holder, some pewter, and a few clear glass mosaic tiles. I provided all the tools needed to complete the project.
Glass Tiles
After cleaning each tile,we cut out and glued a small image from a serviette, onto the back of the tile.
Cutlery Holder
Everyone painted their wooden item with acrylic paint, and let it dry.
A piece of pewter was cut to fit onto one side of the cutlery holder, then an image was traced onto it, and using an embossing tool, the image was gently raised.
The pewter was treated with patina, and then the black was rubbed off with brasso cleaner. The treated pewter was glued onto the wooden base.
The glass tiles were glued onto the wooden base in position.


 ðŸ˜žðŸ˜žðŸ˜ž WHAT HAPPENED? Unbelievable! I cannot fathom out WHY I stopped writing on my blog after May 2017!!! I also cannot remember what happ...