

This card - although it looks difficult to make - is in fact so easy once you know how! Follow the instructions below, and remember to have fun!
What you need
- Coloured cardstock for the base of the card – a piece 5 ½ x 12 inches ( x cm)
- Scoring pen
- Paper trimmer or guillotine
- Patterned paper to match the cardstock colour (I used the ‘Tweetstitch’ paper from the Cardmaking CD Issue 21)
- Toppers or other embellishments to suit your theme (mine is a girl toddlers’ birthday) (I used the toppers in the ‘Animal Magic Collection’ from the Cardmaking CD Issue 21)
- Craft knife
- Ruler (preferably a steel one so your blade won’t cut it!)
- Adhesives (glue, double-sided tape, foam pads)
If your piece of cardstock is 12” x 12”, cut it down to 5 ½” x 12” in size. Mark your cardstock as shown below, then score along the dashed lines (---).

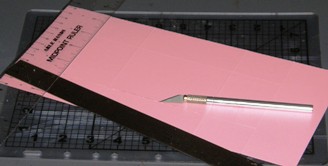 Now mark 1 ½ “ in from each long side of the card, and using your craft knife, cut (bold dotted lines) a slit between the 2” and 10” marks. Remember to do this on both edges!
Step3 (folding the card)
Fold the card along the scored lines using valley and mountain folds, and the best way to show you is in the photo below.

Step 4 (cutting the patterned paper)
 Using your folded card as a template, trace the T-shaped section onto your patterned paper – twice as you need two of these shapes. TIP: if your pattern is a 1-way pattern eg. the birdies on my card, remember to FLIP the second T-shape otherwise your birdies will be upside down (I learnt the hard way!). Cut out both shapes. Now trim these patterned paper shapes on all sides by 1/16”. From the same patterned paper cut out the following pieces: 4 x pieces 1 7/8” x 1 3/8” each; 2 x pieces 1 7/8” x 3 7/8” each; and1 x piece 2 3/8” x 3 7/8”.
The aim is to stick a piece of paper onto EACH of the panels between the score lines, and to allow a tiny border of the base cardstock to show around the paper. This means all your rectangles should be about 1/16” smaller than the panel. Test them out before you go to step 5!
Step 5 (attaching the panels)
Using double-sided tape, make sure all the patterned panels are stuck in their correct place (be careful not to stick it on upside-down!).
Your basic card is completed, and you can go on and decorate it to your heart’s desire. Here’s how I did mine.
Step 6 (the fun part!)
Your basic Tri-Shutter card is complete, well sort of. Now comes the fun part of embellishing it with all sorts of doodahs and bling! Because my card is for a 3 year old, I printed out two large number 3s, and raised one on top of the other with foam pads, then covered it with glitter glue. The greeting (Veels Geluk = Afrikaans for Congratulations or Happy Birthday) is a peel off I stuck onto the ‘board’ the teddy is holding. The toppers were all printed out twice and paper-pieced to raise some pieces. Just for fun I hung 3 tiny teddy beads on jumprings underneath the ‘3’.


