Sorry I've been so quiet but am still sitting in Zambia (work related), and have been here for nearly a week already. It's amazing actually - I've got card-making/craft room withdrawal symptoms! Eventhough I have so much work, well into the night, I am still feeling restless. At least I can still access the internet and catch up on the card blogs and forums! But my fingers are ITCHING to make a card. Scary how reliant we become on internet access and our crafts! Anyway, will be home tonight so can't wait to catch up properly. Hope you all doing well.
Margy (can't even add my signature - boohoo)

Saturday, August 28, 2010


Wednesday, August 18, 2010
Flower girl
Another card made with a Digistamps4joy stamp. The challenge was to make a card based on a sketch, and here is my take on the sketch. The cream, embossed paper, was from my scrap stash. The circles were cut with nestabilities - love these things!
How many of you do what I do? All my bits and pieces of paper are kept in see through acetate sleeves, arranged per colour. So if I'm looking for a small, blue scrap, I can just pull out the sleeve, scratch through the pieces, and use it on the card. I must credit this idea to my dearest sister, but it works for me! I loathe throwing away any bit of paper - if it's big enough to punch a shape out of, it stays!


How many of you do what I do? All my bits and pieces of paper are kept in see through acetate sleeves, arranged per colour. So if I'm looking for a small, blue scrap, I can just pull out the sleeve, scratch through the pieces, and use it on the card. I must credit this idea to my dearest sister, but it works for me! I loathe throwing away any bit of paper - if it's big enough to punch a shape out of, it stays!

Celebrate His birth
This card was made with a digistamp I designed for Digistamps4joy, so head over and buy some of their stamps, they are really lovely. There's even a super freebie there! The funny yellow colour on the card is actually a gorgeous, speckled, gold foil - the photo unfortunately does not do it justice. Each of the little christmas lights were glittered as well. The background was stippled with a stamp pad and a stippling brush in 2 shades of blue.


Da Bomb!
Isn't this just the most amazing digistamp? I purchased it from Kenny K's a while ago, but just couldn't make up my mind what to do with it. That is, until I saw this purple paper!! I pushed it through the Cuttlebug with the mesh foulder, stamped a slightly darker colour on the embossed areas, then tore the paper to give the white edge. I would normally never mix purple, blue and red, but this all just fell into place while I was making the card. Perhaps it is the black bordering that makes it pop out? Mmmm, next time I must put a purple streak in her hair!


Tuesday, August 03, 2010
Thinking of You
A rather plain card made with my own stamp. Coloured with watercolour pencils, and bits 'n bobs added.


Friday, July 30, 2010
Michelle Perkett BLOG HOP!
Below is the card I made from "Leilani" from the so-creative DT of Michelle Perkett Studio Design
for her blog hop. I painted watercolour paper for the sunset background, added handmade paper for the sand, and then makde a shaker for the sea.


for her blog hop. I painted watercolour paper for the sunset background, added handmade paper for the sand, and then makde a shaker for the sea.


Wednesday, July 28, 2010
"Summer" digistamp
The second card for Digistamps4joy.com was made from their digistamp called "Summer". I decided to be a little ambitious and try making a 'swing card'. Well I got it right, but it took me nearly 3 hours to make this card from colouring the stamp to cutting out all the card pieces! The end result is quite pleasing and eventhough I'm not an 'orange/yellow' person (blues, pinks, and purples for me thanks!) I quite like the colour of this card. Luckily I had a whole packet of orange and yellow flowers on hand. I think my biggest concern while making the card was that the oval topper would keep floppnig down. I may have overcompensated for this as it is quite stiff to turn!

 Front and back of the oval swing topper.


Tuesday, July 27, 2010
NADIYA stamp
I am thrilled to be able to advertise the Digistamps4joy stamps, and this is the first card I made with the stamp "Nadiya". Isn't she absolutely gorgeous? Did I mention before that I love bling, well this stamp lends itself perfectly to looooots of bling!
 I used my watercolour pencils to colour her in, then added lots of bling to her clothing and golden necklace. Two circles were cut with the largest 2 of the Nestabilities 'Petite Scalloped Circles', and the edge of the smaller circle was glued and glittered. I cut a floral border with a Fiskars punch, added some organza ribbon and pink gems, and stuck all of this onto a pink cardstock with hearts. The swirly flower on the left is a rub-on.
I think I'm still going to have lots of fun with "Nadiya".


I think I'm still going to have lots of fun with "Nadiya".

Saturday, July 24, 2010
Window digi
Last night I designed another digistamp, this time trying the Inkscape software. It took me a little while to get comfortable with making rounded edges, but I'm happy with the result. So now to make a card with the stamp!
 I decided to make an easel card, print out 2 x images, cut out the inside panes of the one and then layer this onto acetate. The second image was coloured in then I cut out the background behind the curtains, found a picture in a magazine with some paintings on the wall, then stuck this behind the curtains. The front window frame was raised onto the second image with foam pads. I think it came out quite nicely and really looks like a window!
Then I hit a blank! Every piece of cardstock or backing paper I put the window on top of just didn't look right, until I found this piece from the Once Upon A Time Mat Stack, and the whole card just fell into place. Does this sound familiar? I glued on a small clay vase, filled it with flowers, and found a 'large leaf' I had forgotten about which I used for the overhanging tree branch. The sentiment "Mom's home" was printed on the puter and raised with foam pads.

 I decided to make an easel card, print out 2 x images, cut out the inside panes of the one and then layer this onto acetate. The second image was coloured in then I cut out the background behind the curtains, found a picture in a magazine with some paintings on the wall, then stuck this behind the curtains. The front window frame was raised onto the second image with foam pads. I think it came out quite nicely and really looks like a window!
 Then I hit a blank! Every piece of cardstock or backing paper I put the window on top of just didn't look right, until I found this piece from the Once Upon A Time Mat Stack, and the whole card just fell into place. Does this sound familiar? I glued on a small clay vase, filled it with flowers, and found a 'large leaf' I had forgotten about which I used for the overhanging tree branch. The sentiment "Mom's home" was printed on the puter and raised with foam pads.

Tuesday, July 20, 2010
Using puff paint
I am lucky enough to have a sister who is a professional screenprinter, and who just 'happened' to give me a whole liter of white puff paint (very difficult to find in craft shops!) the last time I visited her! So .... as there is one little animal that God made that lends itself perfectly to white puff paint, of course I had to make a card. The 'ewe' also provided a super opportunity to play with the word - hehe.
 I had a lovely piece of bright red card with a white backing that was just waiting to be cut into a heart shape. My little ewe (also compliments from my sister) was cut on the Cricut and I coloured the legs, squeezed out lots of puff paint from a fine nozzled bottle, puffed the paint with the hot air dryer, and then stuck on one googly eye and a red ribbon. Isn't she cute? The words ... 'Thinking of ewe"
 were printed on the pc, then a border of puff paint put on to resemble a cloud. Both the ewe and the cloud were raised with foam pads. The flowers were an afterthought as I had this large empty space top left of the heart, but they seem to have done the trick!


Sunday, July 18, 2010
Cracker shaped 'shaker' card
This card was made for a challenge viz. "make a card in the shape of a cracker and add serviette, clay, and mirror tile". Cutting the shape of the card was not as difficult as I thought it would be, and the shape is actually quite pleasing. It was the adding of the tiles and clay that stumped me at first. That is until I saw this absolutely gorgeous 'fat lady' decoupage paper and the creative juices just RAN! I probably went a little overboard with the 'shaker' oval, but I love making shaker cards and they are always so popular with my customers.
 So this is where I used all the challenge pieces:
1. Serviettes - I cut out 4 purple daisies out of a serviette and glued them onto the patterned maroon coloured paper.
2. Clay - the only clay embellishment I could find that suited this picture was a tiny peach coloured rose which I glued on top of the acetate of the shaker box.
3. Mirror tiles - In the image, the fat lady is looking into a mirror. Yes, you guessed it - I replaced the mirror part of the image with four tiny mirror tiles! Worked like a charm, and as they are all inside the shaker box no one handling this card will get hurt - a bonus in my opinion!
I could not resist the tiny gold shaker beads to compliment the gold colour around the purple daisies, and the gold spotted ribbon just finished it all off. A lot of work, but well worth it.

1. Serviettes - I cut out 4 purple daisies out of a serviette and glued them onto the patterned maroon coloured paper.
2. Clay - the only clay embellishment I could find that suited this picture was a tiny peach coloured rose which I glued on top of the acetate of the shaker box.
3. Mirror tiles - In the image, the fat lady is looking into a mirror. Yes, you guessed it - I replaced the mirror part of the image with four tiny mirror tiles! Worked like a charm, and as they are all inside the shaker box no one handling this card will get hurt - a bonus in my opinion!
I could not resist the tiny gold shaker beads to compliment the gold colour around the purple daisies, and the gold spotted ribbon just finished it all off. A lot of work, but well worth it.
Friday, July 02, 2010
Freebies (topper and digistamp) - men's tie
For those of you who have not tried using a digistamp yet, here is a freebie for you to start with. I have also added a coloured stamp (= a topper) which you can also download (right click and save).
And don't forget I'd love to see what you've done with it! My card design is below.


And don't forget I'd love to see what you've done with it! My card design is below.


Wednesday, June 30, 2010
Instructions: How to make a Tri-Fold Shutter card

This card - although it looks difficult to make - is in fact so easy once you know how! Follow the instructions below, and remember to have fun!
What you need
- Coloured cardstock for the base of the card – a piece 5 ½ x 12 inches ( x cm)
- Scoring pen
- Paper trimmer or guillotine
- Patterned paper to match the cardstock colour (I used the ‘Tweetstitch’ paper from the Cardmaking CD Issue 21)
- Toppers or other embellishments to suit your theme (mine is a girl toddlers’ birthday) (I used the toppers in the ‘Animal Magic Collection’ from the Cardmaking CD Issue 21)
- Craft knife
- Ruler (preferably a steel one so your blade won’t cut it!)
- Adhesives (glue, double-sided tape, foam pads)
If your piece of cardstock is 12” x 12”, cut it down to 5 ½” x 12” in size. Mark your cardstock as shown below, then score along the dashed lines (---).

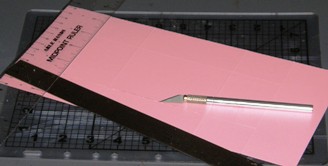 Now mark 1 ½ “ in from each long side of the card, and using your craft knife, cut (bold dotted lines) a slit between the 2” and 10” marks. Remember to do this on both edges!
Step3 (folding the card)
Fold the card along the scored lines using valley and mountain folds, and the best way to show you is in the photo below.

Step 4 (cutting the patterned paper)
 Using your folded card as a template, trace the T-shaped section onto your patterned paper – twice as you need two of these shapes. TIP: if your pattern is a 1-way pattern eg. the birdies on my card, remember to FLIP the second T-shape otherwise your birdies will be upside down (I learnt the hard way!). Cut out both shapes. Now trim these patterned paper shapes on all sides by 1/16”. From the same patterned paper cut out the following pieces: 4 x pieces 1 7/8” x 1 3/8” each; 2 x pieces 1 7/8” x 3 7/8” each; and1 x piece 2 3/8” x 3 7/8”.
The aim is to stick a piece of paper onto EACH of the panels between the score lines, and to allow a tiny border of the base cardstock to show around the paper. This means all your rectangles should be about 1/16” smaller than the panel. Test them out before you go to step 5!
Step 5 (attaching the panels)
Using double-sided tape, make sure all the patterned panels are stuck in their correct place (be careful not to stick it on upside-down!).
Your basic card is completed, and you can go on and decorate it to your heart’s desire. Here’s how I did mine.
Step 6 (the fun part!)
Your basic Tri-Shutter card is complete, well sort of. Now comes the fun part of embellishing it with all sorts of doodahs and bling! Because my card is for a 3 year old, I printed out two large number 3s, and raised one on top of the other with foam pads, then covered it with glitter glue. The greeting (Veels Geluk = Afrikaans for Congratulations or Happy Birthday) is a peel off I stuck onto the ‘board’ the teddy is holding. The toppers were all printed out twice and paper-pieced to raise some pieces. Just for fun I hung 3 tiny teddy beads on jumprings underneath the ‘3’.

Thursday, June 03, 2010
Soccer side-stepper card

Stamped 'lady'
I found this gorgeous 50's look rubber stamp which was sreaming to me ... buy me buy me! How could I resist? I stamped 3 images and coloured each one in with watercolour pencils, then paper pieced the lady together, and glued a guineafowl feather under her hat. The background was a printout of a freebie onto which I stamped a brown butterfly and added some tags and jewels.


Hello Kitty card
My granddaughter turned 7 and wanted a card showing "hello kitty". The image I found was perfect for making a shaker card with the 'heart' that the kitty was holding. The background was a piece of scrapbooking paper I found with an allover design of Happy Birthday, and I just highlighted some of the words with clear glitter glue.


Monday, May 03, 2010
FIFTY Birthday Book
I just have to show you this wordbook I made from scratch!
It was my sister-in-law's 50th birthday and we were invited to her party. Once again I decided to make something as I know she appreciates craftwork. As there were no downloadable '50' wordbook templates on the internet, I decided to try my hand at designing my own. I used the letters f-i-f-t-y and played around with some A4 scraps of paper to get the proportions correct. After downloading a font called 'pharmacy' from the internet, I typed the word 'fifty' in MSWord, and made the letters as big as possible. I then cut each one out and pasted the letter onto a piece of grey chipboard, each piece progressively wider than the last one. The hardest task was to cut out all these chipboards pages! My hands were aching afterwards from all the pressure I had to put on the craft knife!
The first job was to cover and paste some nice embossed paper onto the front and back of each letter. The lefthand pages were kept for guests to write on, and the righthand side for photographs which she could paste in after the event.
The book really looked nice after all the embellishments were glued on, and my sister-in-law absolutely LOVED it!. All the guests wrote little notes to her on the tags provided. The pages of the book were bound together with 2 large rings, and then some nice organza ribbon threaded through and tied up.
The 'closed' book.
 The back of the letter "f" showing little pockets made with small notelets in each one.

 I also inserted her 'clinic card' from when she was a baby. I had inhertited this card with a suitcase full of photos when her father died, and felt now was the perfect time to give it back to her!
 Two weeks after her party, we put her photos in and completed the album!
It was my sister-in-law's 50th birthday and we were invited to her party. Once again I decided to make something as I know she appreciates craftwork. As there were no downloadable '50' wordbook templates on the internet, I decided to try my hand at designing my own. I used the letters f-i-f-t-y and played around with some A4 scraps of paper to get the proportions correct. After downloading a font called 'pharmacy' from the internet, I typed the word 'fifty' in MSWord, and made the letters as big as possible. I then cut each one out and pasted the letter onto a piece of grey chipboard, each piece progressively wider than the last one. The hardest task was to cut out all these chipboards pages! My hands were aching afterwards from all the pressure I had to put on the craft knife!
The first job was to cover and paste some nice embossed paper onto the front and back of each letter. The lefthand pages were kept for guests to write on, and the righthand side for photographs which she could paste in after the event.
The book really looked nice after all the embellishments were glued on, and my sister-in-law absolutely LOVED it!. All the guests wrote little notes to her on the tags provided. The pages of the book were bound together with 2 large rings, and then some nice organza ribbon threaded through and tied up.
The 'closed' book.


Baby Shower book
This was my first scrapbooking 'word-book' I made. I was invited to a baby shower, and because I am not fond of buying gifts 'made in China' I decided to make her a little 'shower' book in which all the guests could write a message at the shower.
I was then lucky enough to find a super little booklet kit at a local shop, with 6 pages cut out of chipboard, 2 binding rings, and few embellishments. The booklet was a huge success, and the mom was absolutely thrilled with this as a gift, so my goal was achieved! Here are the pages I put together - before everyone wrote on it - with odds and ends I had at home. I designed it so that all the guests would write on the left-hand page on one of the tags provided.


I was then lucky enough to find a super little booklet kit at a local shop, with 6 pages cut out of chipboard, 2 binding rings, and few embellishments. The booklet was a huge success, and the mom was absolutely thrilled with this as a gift, so my goal was achieved! Here are the pages I put together - before everyone wrote on it - with odds and ends I had at home. I designed it so that all the guests would write on the left-hand page on one of the tags provided.


Saturday, May 01, 2010
Masculine scrapbooking pages
While working on my deceased husbands' scrapbook album, I had very little problems doing pages for him as a little boy. These two matching pages were prepared around the theme of a train pulling the carriages, each with a successively older picture of him as a boy. The train was paper pieced "by hand". I still don't own a fancy cutting machine!

The page I enjoyed doing the most was the page of his airforce duty time. I still had some of his original uniform badges, so polished them up and added them to the one page.

However, finding a theme for a few portrait photos of him as a mature man was a different story! None of the photos screamed any particular theme, so I ended up doing 2 pages called "Portrait of a Man", and paper-pieced a little man to fit in with the pages. The other bits and pieces (hats, waistcoat, shaving brush etc) were all cut out of a decoupage sheet I found in one shop.


The page I enjoyed doing the most was the page of his airforce duty time. I still had some of his original uniform badges, so polished them up and added them to the one page.

However, finding a theme for a few portrait photos of him as a mature man was a different story! None of the photos screamed any particular theme, so I ended up doing 2 pages called "Portrait of a Man", and paper-pieced a little man to fit in with the pages. The other bits and pieces (hats, waistcoat, shaving brush etc) were all cut out of a decoupage sheet I found in one shop.

Table weights
Niki decided she needed to make some extra cash, so I got roped into paying for some items to make table weights. Not that I minded really, because I was glad she was doing some craftwork at last. So we ended up at this one large bead shop, and must have spent nearly 2 hours there while she tried to make up her mind about which beads and stones matched, and whether they were the correct weight - or not!
Armed with this heavy bag of goodies we set up 'camp' at home in the craft room, and spread out everything on the table. Tiger's tail, pliers, crimps, newly bought shells and beads and stones ... we were ready to sell to the world!
The end results of this craft session were four gorgeous sets of table weights - quite exclusive actually (Niki has expensive taste). We set about working out their costs, and then adding a bit extra on for profit. Have we sold any of them? No. Two have already been given out as gifts - one for a 50th birthday and the other for a wedding gift. Of course we made exclusive boxes to gift them in as well. Now we just need another 2 weddings and they will all be gone! Must say though that they turned out rather nice.
(Top left = glass+pearl; top right=conch shell and pearl)
(bottom left=paua shell; bottom right=semi precious stones).


Armed with this heavy bag of goodies we set up 'camp' at home in the craft room, and spread out everything on the table. Tiger's tail, pliers, crimps, newly bought shells and beads and stones ... we were ready to sell to the world!
The end results of this craft session were four gorgeous sets of table weights - quite exclusive actually (Niki has expensive taste). We set about working out their costs, and then adding a bit extra on for profit. Have we sold any of them? No. Two have already been given out as gifts - one for a 50th birthday and the other for a wedding gift. Of course we made exclusive boxes to gift them in as well. Now we just need another 2 weddings and they will all be gone! Must say though that they turned out rather nice.
(Top left = glass+pearl; top right=conch shell and pearl)
(bottom left=paua shell; bottom right=semi precious stones).


Subscribe to:
Posts (Atom)
😞😞😞 WHAT HAPPENED? Unbelievable! I cannot fathom out WHY I stopped writing on my blog after May 2017!!! I also cannot remember what happ...

-
 This HOP is now CLOSED. The lucky winner from my blog is .... DESIRE FOURIE. Aaaand, Kristi of www.kristidailey.com DONATED the prize! How...
 -
Digistamps4Joy is celebrating it's 100th Blog Challenge " CELEBRATION " with a Blog Hop running from 3-16 September 2...
-
 The Blog Hop has now closed. Thanks so much for everyone who visited and left a comment - I loved every comment! Please come back here or ...
