for her blog hop. I painted watercolour paper for the sunset background, added handmade paper for the sand, and then makde a shaker for the sea.


 I decided to make an easel card, print out 2 x images, cut out the inside panes of the one and then layer this onto acetate. The second image was coloured in then I cut out the background behind the curtains, found a picture in a magazine with some paintings on the wall, then stuck this behind the curtains. The front window frame was raised onto the second image with foam pads. I think it came out quite nicely and really looks like a window!


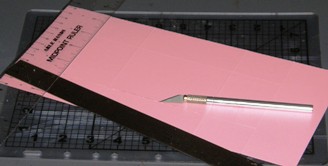 Now mark 1 ½ “ in from each long side of the card, and using your craft knife, cut (bold dotted lines) a slit between the 2” and 10” marks. Remember to do this on both edges!
 Using your folded card as a template, trace the T-shaped section onto your patterned paper – twice as you need two of these shapes. TIP: if your pattern is a 1-way pattern eg. the birdies on my card, remember to FLIP the second T-shape otherwise your birdies will be upside down (I learnt the hard way!). Cut out both shapes. Now trim these patterned paper shapes on all sides by 1/16”. From the same patterned paper cut out the following pieces: 4 x pieces 1 7/8” x 1 3/8” each; 2 x pieces 1 7/8” x 3 7/8” each; and1 x piece 2 3/8” x 3 7/8”.


Man, but 2008 just FLEW away and it felt like the year was shorter than normal. When I look in the mirror however, I can see that time has gone by. Did I accomplish everything I planned for the year? Certainly not. Regardless of all my goals and plans, the year has slipped by as if to spite me. No regrets however – I am very thankful to the Lord for this past year – no matter how difficult it may have been.
Apart from being given a gorgeous new grand daughter on the 10th December 2008, the other two grandchildren doing well and growing up fast, the rest of the family has been well. My only two visits out of the country this year were both work related, one to Botswana and the other to Malawi (my first visit). I loved Malawi and the people there and hope to make another trip back doing something different and more personal like Bible placement.
This has been a very busy year - craft wise - and probably an indication of the higher stress levels I was under. The higher the stress - the more I craft!!!!
JEWELLERY
I started the year by signing up for a silversmith course and learnt to make metal jewellery. Eventhough I went home after every lesson with less skin on the tips of my fingers (from filing metal), I have enjoyed this new skill so much. Certainly not a cheap hobby though, so I only bought the basics and set up a jewellery worktable at home. We leart on copper first, then progressed to silver. Gold? Noooo too expensive and if you see how much gets filed/sanded off, you would also think 5 times before working with gold! Here are “some” of my original items I have already made. The "moth" earrings are actually a replicate of the African Armyworm moth that I research!


Then it was onto SCRAPBOOKING!
I can’t explain but for some silly reason I have put off learning this skill for 3 years! During a week-long visit to my sister however, we spent every day doing a little scrapbooking and a lot of shopping for items! I came home after my visit with a boot full of goodies and a head full of ideas. Since then I've completed an album on my mom, and have started one on my deceased husband. Great fun but also an addictive spending habit!!!!!!!!
WOODWORK
The only project that was completed was a vanity table for my granddaughter for Christmas. My daughter had been given this item by a work colleague, but it was in desperate need of repair. My fingers ‘itch’ when I see things like this! So my young grandson (4) helped me to sand it down, and then I hid it from prying eyes until it was varnished, painted, and ‘prettied up’. Here is the end result and my granddaughter loves it!.

GENEALOGY
The family tree has more than doubled in size during this year (3,800 names) as I have found many side family links, mostly through the Stride (Dad’s mom) and Hockey (Martin’s mom) lines. The Kieser and Powell lines have unfortunately hit a brick wall but who knows maybe 2009 will open some doors there. It’s probably time for me to start putting all this information into a book form, but genealogy is like putting together a jigsaw puzzle – you’re never satisfied until all the pieces are in place. The problem with this particular hobby is that there is ALWAYS another piece!
So .... 2009 here we come!
Margy
 My craft work seemed to take a bit of a back seat with all the house repairs I undertook. Oh, and I eventually got that wardrobe built into my room - something I will never regret! This is my first built-in wardrobe - ever - so is absolute luxury for me. Not of course that we coudln't afford it when I was a child, or in my marriage, but we always seemed to have these loose wardrobes that could be shifted around when the room was re-arranged! Here's a photo of the cupboard in the newly painted room, and before I moved back in. Then, to complete the makeover I went and purchased a bedroom suite and now have a matching bed, dresser, and stool (also a first).
 for me when I was a little girl, and I have kept it all these years. It needed a good sanding, new wire springs installed, and then a few coats of varnish. To round off, I made a new mattress, pillow, and linen for the bed, and decoupaged some pictures onto the headboard. Abby helped me choose the material for the bed, and then stood like a supervisor next to me while I sewed all the items. She would not let me even take a tea break until it was all finished and she could put her doll “to bed”!
 The last task I undertook for the year was to have a very large fish tank custom built for my lounge. I have always had a fish tank but a small one, and nothing to brag about. I am thrilled with the new tank and have had so much fun putting in plants and fish. At the moment there are one Plecostobus (my "vacuum cleaner"), 2 x Bala Sharks, 2 Corydoras, 5 LARGE Angel fish, and 2 Pearl Gouramis. The fish must be happy because 2 Angel fish have paired up and laid 12 batches of eggs already!! The problem is of course that while the eggs are being laid, the Bala shark (male) and the male Gourami are stealing them from under the female's dorsal fin!
😞😞😞 WHAT HAPPENED? Unbelievable! I cannot fathom out WHY I stopped writing on my blog after May 2017!!! I also cannot remember what happ...


